This ATX motherboard with TR4 socket forms the basis for our “TR server”, a high-performance Proxmox server for virtualizing Windows 10 and 11 VMs. For a long time, it ran the UEFI version “F13a” without any problems.
After recently seeing that there is a newer version available – “F13d” – I wanted to update the board to this version. It is important to note that this motherboard has a “DualBIOS,” i.e., a second UEFI that boots instead of the first one in case of an error.
So far, so simple: save the settings in the UEFI, format a USB stick with 4 GB or less as FAT32, copy the new firmware. Plug the USB stick directly into the board, switch to “Qflash” at startup with “END” and start the update after navigating to the file. The model name is correct, and there are no other abnormalities.
And then things went downhill.
At first, the update stalled a little, but then ran through to 100% and the computer restarted on its own. There was no POST from this first, freshly updated UEFI: without any beeps or similar, it finally booted from the backup UEFI after several attempts. I only noticed this because I had disabled the LED lighting and it was now glowing red.
Surprisingly, the UEFI version that had now started was “F12” from 2019, which was older than the previously installed ‘F13a’ and also older than the latest version I had actually updated to, “F13d”. Then I thought, “I’ll update it again here too, maybe something went wrong.” No sooner said than done – I updated it again from the UEFI using Qflash. Again, it ran a little sluggishly but got through. Then the automatic restart again.
“No Boot”
Nothing worked anymore. No beeping, and according to the digital error code (luckily this board has a display for it!), the UEFI kept booting in a loop between “3E” and “C2”. At that moment, I thought the board was dead without a lot of fiddling around with manual flashing.
Many restarts later, there was still no change. So I did some research—others must have encountered this problem too. In fact, I was lucky in my misfortune: this motherboard has “Qflash Plus,” which I wasn’t aware of. This allows you to restore the UEFI if it is defective or corrupt. Great feature!
UEFI Recovery
The manual (archive.org) for this motherboard explains how to proceed on page 75. The computer should of course be switched off. For simplicity’s sake, here are the steps:
Step 1: Firmware
Download the desired firmware version from the Gigabyte website. (here, archive.org).
Step 2: Unpacking
Unpack the ZIP archive.
Step 3: Rename
Rename the included firmware file (16 MB in size) and its file extension to: "GIGABYTE.bin".
Step 4: Copy file
Use a USB 2.0 stick with a maximum capacity of 32 GB that is formatted as FAT32 and place the renamed file on it. A stick with a status LED is very helpful for seeing the activity.
Step 5: Plug the stick in
The Mainboard has a white USB-Port (archive.org), plug the stick in there.
Step 6: Flashing
Turn on the computer. If the stick has a status LED, it will light up briefly during initialization. After a short time, an orange LED will flash next to the white USB port and the stick should also show activity for a few seconds.
Step 7: Flashing finished
After a while, nothing will light up anymore. Either the computer will restart automatically, or you will have to manually switch the power supply off and on again. Remove the USB stick in the latter case.
Step 8: First POST
Start with the power button; it takes a really long time for a response to appear. If the board beeps, just ignore it. Eventually, the familiar silver “AORUS” boot screen will appear.
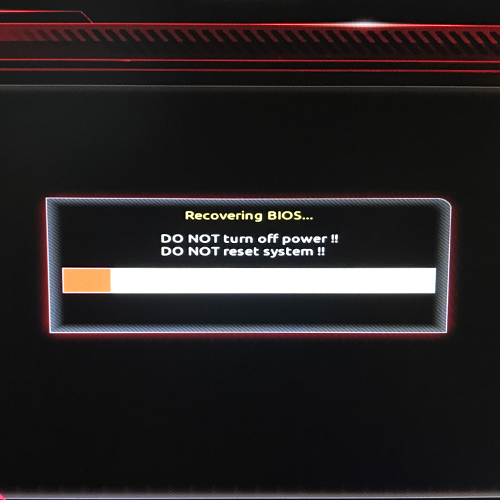
Step 9: Recovery
Press “DEL” to enter UEFI. This will start a recovery sequence, which will take some time. Afterwards, you will be back in UEFI and the board will be saved!
Puh.
First of all, thanks to Gigabyte for making this “headless flashback feature” available. At the same time, the UEFI is really unstable, freezes often, and the backup UEFI was more annoying than useful. But the server is up and running again.
The latest UEFI for this motherboard, “F13d”, still does not run via Qflash Plus. The 2021 version, “F13a”, no longer runs this way either! I had to downgrade to the 2019 version “F12”, which worked right away. Totally illogical, since “F13a” was previously installed and ran without any problems. Resetting the CMOS didn’t change anything. Since little has changed technically, I can live with the older version, but I still find it strange.
Even updating from the working version “F12” to one of the two F13 versions doesn’t work. Everything looks fine at first, but in the end, there is no POST again. I have read in several places that a lot of RAM could be part of the problem, but I didn’t want to take the server apart because everything is very tightly built. I’m running 128 GB DDR4-2666 @ 3000 MHz in the form of 8 sticks with 16 GB capacity each. With less, the boot might work again with the newer versions.
I hope I was able to help someone with this. I really thought I would have to find another X399 motherboard as a replacement.