Anyone who owns a mouse and uses it extensively will have encountered the same problem over the last 10+ years: at some point, a single click turns into a double click. Not always, but more and more often. It may sound harmless at first, but it’s not—you can no longer use your computer properly. Actions that require you to hold down the mouse button are particularly problematic. Impossible.
The reason is easy to find: manufacturers, especially of expensive gaming mice, use very cheap buttons that produce these double clicks as a final symptom of wear and tear. My partner and I have been using a Roccat Kone XTD and a Roccat Kone Pure gaming mouse for many years, respectively, which were not exactly cheap. We are also very happy with them; the sampling rate is good and the lighting is nice. If only it weren’t for the double clicks, which started to occur more and more frequently after 3-4 years of use. Later, this even happened with the right mouse button.
I have also experienced this problem with various models from Logitech (from $10 to high-end, it doesn’t matter), Microsoft, and Mad-Catz.
Repair?
Actually, the fix is very simple. Unfortunately, gaming mice are more often than not held together by plastic clips, which makes disassembly very difficult. Added to this are RGB lighting, cable routing, and adhesive. The process with the Roccat Kone XTD was anything but pleasant, but it was doable.
I have now repaired more than 20 mice in this way. One side effect is that the clicking sound is louder and you have to press a little harder to click. It has been over six years since I repaired the Kone XTD and Kone Pure, and they still click very well, despite even increased use. I think the plastic of the housing will wear through before the problem occurs again.
The following tools should be at hand:
- Soldering iron, preferably with medium power (no SMD!)
- Small flat-nose or needle-nose pliers
- Slotted screwdriver
- Small vise
- One or more sewing needles
- Bit set for disassembling the mouse
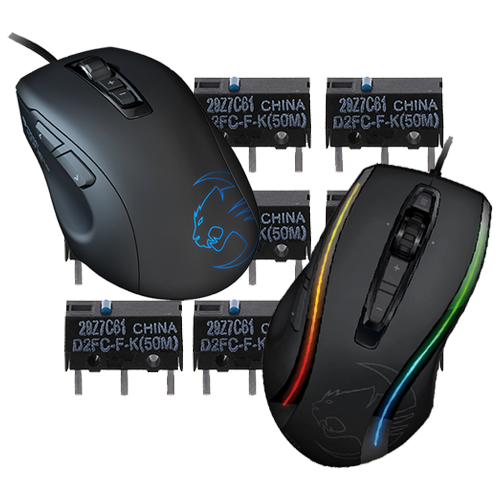
The only spare parts needed are new buttons, which are available in various quality grades. I can recommend the well-known manufacturer Omron, which also produces the often inferior originals. I used the D2FC-F-K model in the “50M” quality grade, which stands for 50 million possible clicks. The originals are often 1M, 2M, or 5M buttons. I bought these on AliExpress*; they are significantly more expensive on eBay or Amazon.
 ⧉ Omron
Let’s go…
First, the mouse must be disassembled until you are holding the actual circuit board with the buttons in your hands. Then, generously tin the three contacts of both buttons with new solder*, also so that the button is heated through.
Next, secure the button with either a small vise or pliers and pull on the circuit board while moving the soldering iron back and forth between all three contacts. After a short time, the button will slip out of the circuit board and can be discarded.
Once this has been done for both buttons, insert a suitable sewing needle into the circuit board hole from the underside (to prevent damage to the conductor tracks when lifting!) for each contact in turn and heat the solder residues. This reshapes the hole into a round shape, which makes it easier to insert the new button.
Now insert a new button through the holes in the circuit board (pay attention to the alignment!) and press it firmly against the circuit board. Then fix it in place with new solder, starting with the middle contact. Once you have done this with both buttons, you can solder the whole thing properly and reassemble it. Done!
Test
Over the years, this problem has occurred frequently with all kinds of mouse models. For testing purposes, I created a small program back in 2018 that can be used to test mice – Download (Windows x86, ZIP-Archive).