For my birthday today, I received a laser engraver/cutter, among other gifts. It is used but in good condition and complete, ideal for beginners. I’ve often toyed with the idea of getting something like this, but the areas of application are very limited – especially if you already own one or more 3D printers. Now I’ll probably have to deal with the topic head-on.
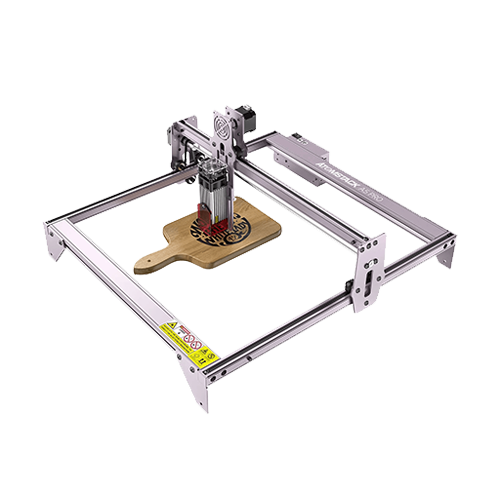
It’s an A5 Pro from AtomStack* with the following technical specifications:
| Engraving size | 410 x 400 mm |
| Engraving materials | Wood, bamboo, cardboard, plastic, leather, printed circuit board, aluminum oxide, non-reflective galvanized coating and lacquer coating, blackened metal |
| Cutting material | Cardboard, non-woven fabric, thin wood shavings, black acrylic, several thin plastic sheets |
| Electrical power of the laser | 40 Watts |
| Optical output power of the laser | 5 – 5,5 Watts |
| Laser wavelength | 455 nm (± 5 nm) |
| Engraving accuracy | 0,01 mm |
| Focusing method | Laser with fixed focus, no focusing |
| Laser safety cover | The laser has a protective cover that protects the user’s eyes; additional protective eyewear is not required. At the same time, it prevents pets from touching the laser point. |
| Control | 32-bit motherboard, USB port. Officially no offline operation. |
Receive today and start using immediately?
Of course not. First, I looked around for a control option and revived a long-forgotten Lenovo ThinkPad X201 (8 GB instead of 4 GB RAM, Samsung SATA SSD, new thermal paste, Windows 11 Pro 25H2 installed). Once that was done, the laser was set up on a trial basis to test its capabilities:


It quickly became clear that something had to be done about the smoke.
Planned upgrades and modifications
I ordered the following parts:
- An inexpensive enclosure with suction and lighting*
- LONGER honeycomb pattern plate* measuring 440 x 440 mm, 22 mm high
- Air pump as air assist in a set*
- 10 x 20 mm cable chains* made of ABS
- Limit switches*
Until everything arrives, I’ll print more upgrades (in black PETG*):
- Air Assist (Thingiverse)
- End stops (Thingiverse)
- Dragging chain mounts (Thingiverse)
- Quick adjustment of the Z-axis (Thingiverse)
I will create mounting options for the laser and the honeycomb plate myself as soon as I have all the components and can take measurements. The whole thing will most likely be built onto a carrier plate, with the option of removing the housing quickly and easily.
Apart from that, the power-hungry components all run on 12 volts DC, which brings to mind the idea of using a central, powerful (Meanwell?) switching power supply instead of three different smaller ones. For 5 volts USB, then possibly a DC-DC step-down converter – that would make two power supplies in total, one for the ThinkPad and one for everything else.
Hardware / Firmware
In this case, it is convenient that AtomStack uses a standard motherboard that can do much more than the supplied firmware allows. At the moment, I don’t plan to expand anything except the end stops – but it would be possible by flashing a different firmware.
This board is installed:

Once all components have been delivered or printed, we will continue.